You can use the following code to get the current date time in CI - https://www.tutorialsplane.com/how-to-get-current-date-time-in-codeigniter/
Tuesday, November 14, 2017
How to create Ionic Popup
You can create Popups in Ionic simply following this link - https://www.tutorialsplane.com/ionic-popup/
Material UI change font size
You can change font simply as below-
https://www.tutorialsplane.com/material-ui-change-fornt-size/
https://www.tutorialsplane.com/material-ui-change-fornt-size/
Magento 2 left join collection
You can use factory method for left joining the collections here is complete example - https://www.tutorialsplane.com/magento-2-left-join-collection-query/
Tuesday, June 6, 2017
Materialize Css Framework Features
Materialize CSS - Materialize is basically latest css framework that is used to create rich responsive UI for web applications. Materialize framework is very easy to learn if you know basic HTML, CSS and JavaScript.
Materialize provides you predefined rich layouts, animations, and many more powerful UI.
Let us see the main components of materialize css framework-
Installation- Materialize can be installed simply by downloading the css and js files from the official site - http://materializecss.com/getting-started.html or you can use cdn. You can follow the complete step to install from this article - Materialize Installation Steps
Container- Materialize Css has some special class to create container- Materialize Css has some special class to create container for creating layouts.
Grid - Grid is an important component of any layout, there are 12 columns inbuilt grid system in materialize css.
Table - Tables are great ways to show the data in tabular form. Materialize framework provides various classes to create the tables.
Chips- Chips basically represents the small information, for example - we add tags to tag our friends in facebook or other social media platform. Tags can be easily created using the chips.
Forms - Form input elements can be created using the predefined classes and html, html5 tags.
Autocomplete- Autocomplete functionality is provided in materialize css.
Date Picker - Date picker in materialize can be added simply using few lines of javascript that will work across all devices.
Buttons- There are several types of buttons avialable which can give the native app button look and feel.
Navigation- Materialize provides classess & javascript to create the beautiful side navigation menu with touch & drag feature which will give the native menu looks and feel.
Saturday, May 13, 2017
Wednesday, March 22, 2017
Making Cards in Ionic Framework
Ionic Cards are great way of sharing information in
organized and controlled way. Ionic cards act as complete set of part i.e. they
can have header, body and footer within themselves. Their mobile visual
representation works better with respect to user experience hence they are
quite popular in terms of use. Their design pattern fits perfectly along
new-age modern devices that many major brands use them in their daily routines.
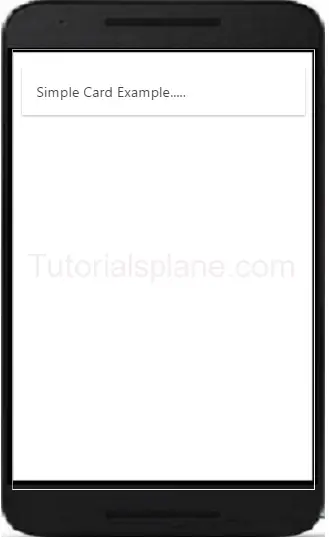
 Below we have provided a sample on Ionic Card Example to begin
with you have the main div element with .card specific class with another child div having
classes of .item
and .item-text-wrap
respectively. And Output of that code follows below that which shows how it will
look in your mobile screens. They have CSS box shadow by default.
<div class="card">
<div class="item
item-text-wrap">
Simple Card Example.....
</div>
</div>
|
 One of the main benefits of using these cards is their
flexibility as they can as page and can also be placed over one another. Also
they can be used for swipe functionality too i.e. swipe left and swipe right as
per given circumstances. Easily controlled, manageable and are animated to draw
user attention while they are going through the content of particular page. Headers and Footer can also be placed inside Ionic Cards
making it useful for all purpose functionality.
Read more Ionic tutorials
with example step by step expert guidance only at our online web portal Tutorialsplane now!
Tuesday, February 14, 2017
IONIC HEADER, CONTENT AND FOOTER
Mobile application development has improved a lot matching
the rise in the use of smartphone in this 21st century. With HTML5,
CSS3 and AngularJS as its fundamental core Ionic provides a lot of easy
solutions for learning mobile application easily. It provides comprehensive mobile
UI elements that are default and just needs to be placed at right place for its
amazing results. Ionic Framework has three basic parts where everything can be
summed up. Ionic header, content and then footer area; these three area cover
all the coding takes place in systematic way.
Starting with Ionic Header is the top area where logos, title and navigation are mostly designed. There is also sub header area where multiple headers are used in case of specific arrangement. Here you can find Ionic header example with complete and code syntax. Multiple colors of choice are available along with suitable icons, buttons to match functioning like settings, home, sidebar menus etc. This is the first impression for every mobile app for the user so a lot of emphasis is placed on its UI & UX performance.

Ionic Content is middle part of the area between header and footer. This is the main section where content is placed for viewer for gaining inputs about the mobile app for example; E-commerce app will have products, food app might have images with recipe in this section. As developer you can put many things using Ionic framework like Ionic Cards, Form, List, Toggle, Checkbox, radio button , ionic range, select box, Tabs, grid are used as per the need of the UI requirements.
Ionic Footer is the bottom part of the mobile screen where navigation, logos and settings can be arranged too. Check out Ionic Footer example with code, syntax and try-it code where you can easily understand how Ionic Footer works in tandem with the other section of the mobile app development. You can use all the basic properties from Ionic like colors, icon and links for making the right combination in your footer.
AngularJS is one another important part of this Ionic Framework.
Making strong UI interactions, animations, gestures, dynamic results and
solutions are based on AngularJS only so if you are looking to get the best
Ionic Framework start using this mobile development learning with AngularJS
now! This mobile framework is completely open source i.e. free to use and has
made strong footholds in the app store with 4+ million apps in the first 3+ years
already.
Subscribe to:
Comments (Atom)


